
Sunday, December 19, 2010
Merry X'mas!
OMG! I am a bad blogger. My last blog was over a year ago. A lot happened during that one year. I was pregnant last Christmas and this Christmas I have a 6 month old joining in the festivities. Please meet my current love and joy of my life.

Saturday, November 14, 2009
daring cooks: 寿司
Daring Cooks' November Challenge – Sushi
The November 2009 Daring Cooks challenge was brought to you by Audax of Audax Artifex and Rose of The Bite Me Kitchen. They chose sushi as the challenge.


My first time making sushi and I realized I don't have the gentle touch. The sushi won't roll right or close. When attempting to cut it, everything just fall apart. This is the 3 pieces of the whole 4 rolls that is presentable. I almost gave up the post today but my dear husband said just pick the best looking one and take some pictures. The pictures came out good, better than real life! LOL. Aside from the look, it taste just fine. Better than I would imagine, the glazed eel and avocado give a deep kind of satisfying taste. And we bought a tube of wasabi and that helps. Without further ado, here is the posted recipe
PART 1 : SUSHI RICE (makes about 7 cups of cooked sushi rice)
Preparation time: 1¾ hours consisting of :-
Rinsing and draining rice: 35 minutes
Soaking rice: 30 minutes (includes 5 minutes making the vinegar dressing)
Cooking and steaming time: 25 minutes
Finishing the rice: 15 minutes
INGREDIENTS:
- 2½ cups uncooked short grain rice
- 2½ cups water
- For superior results use equal volumes of rice and water
Optional Ingredients
- 3 inch (75mm or 15 grams) square dashi konbu (or kombu) (dried kelp seaweed) wipe with a damp cloth to remove white powder & cut a few slits in the sides of the kelp to help release its flavours
- 2½ teaspoons (12.5 mls) of sake (Japanese rice wine)
Sushi vinegar dressing
- 5 Tablespoons (75 mls) rice vinegar
- 5 Teaspoons (25 mls or 21 grams) sugar
- 1¼ Teaspoons (6.25 mls or 4.5 grams) salt
DIRECTIONS:
Rinsing and draining the rice
- Swirl rice gently in a bowl of water, drain, repeat 3-4 times until water is nearly clear. Don't crush the rice in your hands or against the side of the bowl since dry rice is very brittle.
- Gently place rice into a strainer and drain well for 30 minutes.
Soaking the rice
- Gently place the rice into a heavy medium pot with a tight fitting lid (if you have a loose fitting lid use a piece of aluminium foil to make the seal tight).
- Add 2½ cups of water and the dashi konbu.
- Set the rice aside to soak for 30 minutes, during this time prepare the sushi rice dressing.
Preparing the Rice Vinegar Dressing
- Combine the rice vinegar, sugar and salt in a small bowl.
- Heat on low setting.
- Stir until the mixture goes clear and the sugar and salt have dissolved.
- Set aside at room temperature until the rice is cooked.
Cooking the rice
- After 30 minutes of soaking add sake (if using) to the rice.
- Bring rinsed and soaked rice to the boil.
- Reduce heat to the lowest setting and simmer, covered, until all the water is absorbed, 12-15 minutes. Do not remove the lid during this process. Turn off heat.
- Let stand with the lid on, 10-15 minutes. Do not peek inside the pot or remove the lid. During this time the rice is steaming which completes the cooking process.
Finishing the rice
- Turning out the rice
- Moisten lightly a flat thin wooden spatula or spoon and a large shallow flat-bottomed non-metallic (plastic, glass or wood) bowl. Do not use metallic objects since the vinegar will react with it and produce sour and bitter sushi rice.
- Remove the dashi konbu (kelp) from the cooked rice.
- Use the spatula to loosen gently the rice and invert the rice pot over the bowl, gently causing the cooked rice to fall into the bowl in one central heap. Do this gently so as not to cause the rice grains to become damaged.
- Dressing the rice with vinegar
- Slowly pour the cooled sushi vinegar over the spatula onto the hot rice.
- Using the spatula gently spread the rice into a thin, even layer using a 45° cutting action to break up any lumps and to separate the rice. Don't stir or mash rice.
- After the rice is spread out, start turning it over gently, in small portions, using a cutting action, allowing steam to escape, for about a minute.
- Fanning & Tossing the rice
- Continue turning over the rice, but now start fanning (using a piece of stiff cardboard) the rice vigorously as you do so. Don't flip the rice into the air but continue to gently slice, lift and turn the rice occasionally, for 10 minutes. Cooling the rice using a fan gives good flavour, texture and a high-gloss sheen to the rice. The vinegar dressing will be absorbed by the hot rice. Using a small electric fan on the lowest speed setting is highly recommended.
- Stop fanning when there's no more visible steam, and all the vinegar dressing has been adsorbed and the rice is shiny. Your sushi rice is ready to be used.
- Keeping the rice moist
- Cover with a damp, lint free cloth to prevent the rice from drying out while preparing your sushi meal. Do not store sushi rice in the refrigerator leave on the counter covered at room temperature. Sushi rice is best used when it is at room temperature.
* Tip: To make sushi rice: for each cup of rice use 1 cup of water, 2 Tbs rice vinegar, 2 tsp sugar, ½ tsp salt and 1 tsp sake. For superior results use equal volumes of rice and water when cooking the sushi rice since the weight of rice can vary. Weight of 2½ cups of uncooked rice is about 525 grams or 18½ ounces.
* Tip: While the rice is draining, soaking and cooking prepare your rice vinegar dressing, sushi fillings and toppings.
* Tip: Photo series on How to Cook Rice with a Pot
http://www.sushiencyclopedia.com/how_to_make_sushi/how_to_cook_rice_with...
* Tip: Photo series on How to Make Sushi Rice with Tools You Already Own
http://www.sushiencyclopedia.com/how_to_make_sushi/how_to_make_sushi_ric...
NOTES:
Sushi Rice – choose a short or medium grain rice. Do not use Arborio, long-grain, or parboiled white rice. Medium-grained calrose is a suitable rice. Rice expands (about 3 times) when cooked so make sure your pot is large enough. Washing the rice removes the rice flour that coats the rice and gives a fresh flavour and scent to the cooked rice. Look for rice that is labelled 'sushi' rice. Cooked sushi rice can be placed in plastic bags and frozen for 3 months, microwave when needed. Cooked sushi rice should be sticky, shiny and the individual grains of rice can been see. Price: AUS $4/KG.
Dashi konbu – or ( dashi kombu) – dried kelp, it looks like broad, leathery, wrinkly greenish ribbon often coated with a white powder. The darker green the leaves, the better the quality of kelp. Dashi konbu adds a refreshing light ocean taste to sushi rice. Price: AUS $1.50 for ten 3”(75mm) squares.
Rice Vinegar – this gives prepared sushi rice its unique clean, crisp taste. Do not use bottled “sushi vinegar” as it is too harsh and has a bitter after-taste. Look carefully at the label of the rice vinegar it should have NO SALT and NO SUGAR in the product. Apple cider vinegar is a good substitute if rice vinegar is not available. You can use mild white wine vinegar or mild red wine vinegar if you cannot find rice vinegar or apple cider vinegar. DO NOT USE NORMAL WHITE VINEGAR it is too harsh. Price: AUS $4 /500ml bottle.
Sake – Japanese rice wine. Do not use cooking sake or Chinese cooking rice wine, look for a reasonably priced drinkable sake. Refrigerate opened sake & use within two months. You can use vodka or a mild tasting gin if sake is not available. Price: AUS $10/500ml bottle.
Sugar – you can use mild honey or any other vegan substitute to give the equivalent sweetness.
PART 2 : Dragon Rolls (also called Caterpillar Rolls)
Preparation time: 30 minutes, plus 1¾ hours to make the sushi rice
Cooking time: about 5 minutes (grilling the eel)
Yield: 2 inside-out (uramaki) sushi rolls
INGREDIENTS:
- 1 sheet 7”x8” (17.5cmx20cm) of toasted nori (dried seaweed sheets), cut into halves
- 1/2 Japanese cucumber
- 2 cups of prepared sushi rice
- Glazed Barbecued Eel (ungai) (about 3½ ounces or 100 grams)
- 1 Avocado
- Vinegared Water – ½ cup of water combined with a dash of rice vinegar
- Various small amounts of sauces to use as the flames of the dragon (or legs of a caterpillar)
Optional
- 2 tablespoons (25 grams or 1 oz) Fish Roe (Fish eggs)
DIRECTIONS:
1.Cut cucumber into strips ¼ inch (6mm) x 7” (175mm) long, then salt, rinse & dry the strips.
2.Grill (broil) the eel for about 2-5 minutes until bubbling. Cut into two lengthwise strips.
3.Halve, pit and peel the avocado. Cut the avocado halves into thin even 1/8 inch (3 mm) slices. Fan out the cut avocado into a 7 inch (175 mm) overlapping pattern.
4.Cover bamboo mat with plastic wrap. Place a sheet of nori shiny side down, lengthwise, on the edge the mat.
5.Moisten lightly your hands in the bowl of vinegared water.
6.Place one cup of rice on the nori and gently rake your fingertips across grains to spread rice evenly. Do not mash or squash the rice onto the nori, the rice should appear loosely packed and be evenly distributed over the entire sheet, you should be able to see the nori sheet in a few places.
7.Flip the rice-covered nori over (so the bare nori is now on top) and place on the edge of the mat closest to you.
8.Arrange one of the eel strips across the length of the nori, not quite centred on it but a little closer to you. Place half the cucumber sticks next to the eel.
9.Lift the edge of the mat closest to you with both hands, keeping your fingertips over the fillings, and roll the mat and its contents until the edge of the mat touches straight down on the nori, enclosing the fillings completely. Lift up the edge of the mat you're holding, and continue rolling the inside-out roll away from you until it's sealed. Tug at the mat to tighten the seal. If the rice doesn't quite close the roll add more rice in the gap and re-roll using the mat to completely cover the inside-out roll. Place the roll on a damp, clean smooth surface.
10.Spread about 1 tablespoon of the optional fish roe along the entire top of the rice-covered roll. Using the plastic covered mat gently press the fish roe so it adheres to the rice.
11.Slide a knife under one fan of avocado and transfer it onto the top of an inside-out roll. Gently spread out the avocado layer to cover the entire roll. Lay the plastic wrapped mat over the avocado-covered roll. Squeeze very gently to shape the roll.
12. Lay a sheet of plastic wrap over the roll. Slice the roll into 6-8 equal, bite-sized pieces, wiping your knife with a damp towel before each slice. Discard the plastic wrap. Repeat the above to make one more roll.
13.Arrange the cut pieces on a serving plate with the sauces so the finished dish appears as a dragon breathing fire and flames (or a caterpillar with many legs).
Tuesday, October 27, 2009
daring cooks: macaroons
The 2009 October Daring Bakers’ challenge was brought to us by Ami S. She chose macarons from Claudia Fleming’s The Last Course: The Desserts of Gramercy Tavern as the challenge recipe.
Thanks Ami for choosing macaroons. I have never done any baking except for basic cakes and I am pleasantly surprised by the result. Even though my macaroons did not rise to be leggy, its still soft and airy and I am loving every bite of it! Again, thanks for making us do this.
PS: Also, being this is my first time piping, my shapes are all over the place. I have macaroons that is as big as my fist and small and dainty and round.


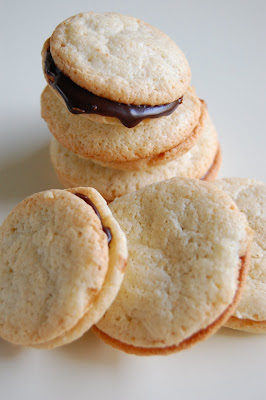

I saw this filling recipe from userealbutter.com. I love her food photography. She rocks!
Thanks Ami for choosing macaroons. I have never done any baking except for basic cakes and I am pleasantly surprised by the result. Even though my macaroons did not rise to be leggy, its still soft and airy and I am loving every bite of it! Again, thanks for making us do this.
PS: Also, being this is my first time piping, my shapes are all over the place. I have macaroons that is as big as my fist and small and dainty and round.


Mandatory:
-Make Claudia Fleming’s recipe for macaroons
-Fill and sandwich the macaroons
Equipment required:
• Electric mixer, preferably a stand mixer with a whisk attachment
• Rubber spatula
• Baking sheets
• Parchment paper or nonstick liners
• Pastry bag (can be disposable)
• Plain half-inch pastry bag tip
• Sifter or sieve
• If you don’t have a pastry bag and/or tips, you can use a Ziploc bag with the corner snipped off
• Oven
• Cooling rack
• Thin-bladed spatula for removing the macaroons from the baking sheets
• Food processor or nut grinder, if grinding your own nuts (ouch!)
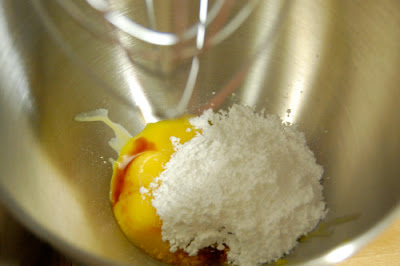
Ingredients
Confectioners’ (Icing) sugar: 2 ¼ cups (225 g, 8 oz.)
Almond flour: 2 cups (190 g, 6.7 oz.)
Granulated sugar: 2 tablespoons (25 g , .88 oz.)
Egg whites: 5 (Have at room temperature)
Directions:
1. Preheat the oven to 200°F (93°C). Combine the confectioners’ sugar and almond flour in a medium bowl. If grinding your own nuts, combine nuts and a cup of confectioners’ sugar in the bowl of a food processor and grind until nuts are very fine and powdery.
2. Beat the egg whites in the clean dry bowl of a stand mixer until they hold soft peaks. Slowly add the granulated sugar and beat until the mixture holds stiff peaks.
3. Sift a third of the almond flour mixture into the meringue and fold gently to combine. If you are planning on adding zest or other flavorings to the batter, now is the time. Sift in the remaining almond flour in two batches. Be gentle! Don’t overfold, but fully incorporate your ingredients.
4. Spoon the mixture into a pastry bag fitted with a plain half-inch tip (Ateco #806). You can also use a Ziploc bag with a corner cut off. It’s easiest to fill your bag if you stand it up in a tall glass and fold the top down before spooning in the batter.
5. Pipe one-inch-sized (2.5 cm) mounds of batter onto baking sheets lined with nonstick liners (or parchment paper).
6. Bake the macaroon for 5 minutes. Remove the pan from the oven and raise the temperature to 375°F (190°C). Once the oven is up to temperature, put the pans back in the oven and bake for an additional 7 to 8 minutes, or lightly colored.
7. Cool on a rack before filling.
I saw this filling recipe from userealbutter.com. I love her food photography. She rocks!
espresso ganache
from Death by Chocolate by Marcel Desaulniers
1 cup heavy cream
2 tbsps unsalted butter
2 tbsps granulated sugar
8 oz semisweet chocolate, chopped
1 tbsp instant espresso powder
Heat the heavy cream, 2 tablespoons butter, and 2 tablespoons sugar in a 2 1/2-quart saucepan over medium-high heat, stirring to dissolve the sugar. Bring the mixture to a boil. Place 8 ounces semisweet chocolate and 1 tablespoon instant espresso powder in a stainless steel bowl. Pour the boiling cream over the chocolate and espresso. Let sit for 10 minutes, then stir until smooth. Keep at room temperature until ready to use.
Wednesday, October 14, 2009
daring cook's challenge
Holy crap! I forgot about the posting date and I saw someone already had this posted. I hope I am not too late.
here goes:
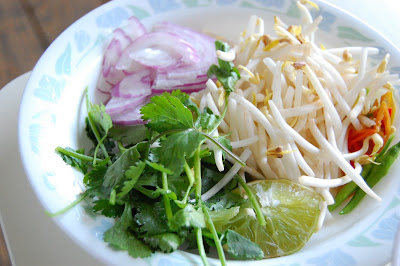
The October 2009 Daring Cooks’ challenge was brought to us by Jaden of the blog Steamy Kitchen. The recipes are from her new cookbook, The Steamy Kitchen Cookbook.
 A really big thank you to Jaden for making us do this. My husband is from Vietnam and he just flipped when he saw what I was making. Short of time and good beef bones, I opted for Chicken Pho, short version. The next time I go grocery shopping in Atlanta, I will surely get some beef bones and try out the Beef Pho! I overbooked myself last weekend, visiting 2 families in one day and then checking out some downtown festival. Short cut Chicken Pho is only what I have time for. It taste good, a tad sweeter than what my husband like but as long as its noodle, he will eat it. Also I opted out of the 2nd challenge, just not enough time!


Ingredients:
here goes:
The October 2009 Daring Cooks’ challenge was brought to us by Jaden of the blog Steamy Kitchen. The recipes are from her new cookbook, The Steamy Kitchen Cookbook.
 A really big thank you to Jaden for making us do this. My husband is from Vietnam and he just flipped when he saw what I was making. Short of time and good beef bones, I opted for Chicken Pho, short version. The next time I go grocery shopping in Atlanta, I will surely get some beef bones and try out the Beef Pho! I overbooked myself last weekend, visiting 2 families in one day and then checking out some downtown festival. Short cut Chicken Pho is only what I have time for. It taste good, a tad sweeter than what my husband like but as long as its noodle, he will eat it. Also I opted out of the 2nd challenge, just not enough time!
The garnish

Chicken Pho


Ingredients:
For the Chicken Pho Broth:
2 tbsp. whole coriander seeds
4 whole cloves
2 whole star anise
2 quarts (2 liters/8 cups/64 fluid ounces) store-bought or homemade chicken stock
1 whole chicken breast (bone in or boneless)
½ onion
1 3-inch (7.5 cm) chunk of ginger, sliced and smashed with side of knife
1 to 2 tbsps. sugar
1 to 2 tbsps. fish sauce
1 lb. (500 grams/16 ounces) dried rice noodles (about ¼ inch/6 mm wide)
Accompaniments:
2 cups (200 grams/7 ounces) bean sprouts, washed and tails pinched off
Fresh cilantro (coriander) tops (leaves and tender stems)
½ cup (50 grams/approx. 2 ounces) shaved red onions
½ lime, cut into 4 wedges
Sriracha chili sauce
Hoisin sauce
Sliced fresh chili peppers of your choice
Directions:
- To make the Chicken Pho Broth: heat a frying pan over medium heat. Add the coriander seeds, cloves and star anise and toast until fragrant, about 3-4 minutes. Immediately spoon out the spices to avoid burning.
- In a large pot, add all the ingredients (including the toasted spices) and bring to a boil.
- Reduce the heat to medium-low and let simmer for 20 minutes, skimming the surface frequently.
- Use tongs to remove the chicken breasts and shred the meat with your fingers, discarding the bone if you have used bone-in breasts.
- Taste the broth and add more fish sauce or sugar, if needed. Strain the broth and discard the solids.
- Prepare the noodles as per directions on the package.
- Ladle the broth into bowls. Then divide the shredded chicken breast and the soft noodles evenly into each bowl.
- Have the accompaniments spread out on the table. Each person can customize their own bowl with these ingredients.
Monday, October 05, 2009
MACY OR CHARTER, who is dumber?
It has been a long time since I have a new post but I want to tell the world, no I need to tell the whole how 'wonderful' customer service is at this age, this age, this era, where China had sent an astronaut to the moon, where with a click of mouse, or mouse pad you can shop, bank and research just about anything under the sky. But, Macy's customer service takes about 40 mins to change my address and phone number, and when I received the new card and tries to activate, it takes me 10 mins and finally gave up and cancel the account. Who, in their right mind, would remember addresses that they have either, been there, live there or associated with (ie, when you are out of country and needs a mailing address) from a few months to a few years. But Macy's security system will require you to answer 3 security questions before they let you do anything, and those questions are street addresses that might or might not be on your credit history for as long as your credit history has been. And when you hmm, and ummm, or gave a wrong answer or said I don't know, they proceed to repeat the question, louder and slower this time, and if you said you don't know, they repeat the question again, spelling out the street address. Dude, I am not senile yet, (hopefully), when I said I don't recognize the options the first time, it meant that I don't recognized them. And what happen? They won't change the address, the phone number, or activate the card. Please, they already have my full name, my last 4-digit of my SSN, my mother's maiden name and my first college address, which was in 1997. What year is it now? 2009!!! It was 12 years ago. And as with everyone in college and post college, you moved every semester, from dorm to dorm, from apartment to apartment when the lease is up. I understand the advanced security measure taken by them, but 40 mins on the phone the first time to change address and telephone number and 10 mins the next time (that is when I said I want to speak to the supervisor), I would still be on the line now trying to answer street addresses, with the poor woman on the other line spelling out every freaking word she said, trying to activate the damn card so that I can spend some money! Finally I told the supervisor, CANCEL THE CARD and THE ACCOUNT. There, nobody is ever going to use the card or my account anymore, so no worries about addresses for the last 20 years. I had some pretty 'amazing' experience with Charter 2 years ago when I moved into this apartment. Read it here and tell them which one is dumber?
Did Charter filed bankcruptcy? I heard Macy is heading that way too.
Did Charter filed bankcruptcy? I heard Macy is heading that way too.
Thursday, September 10, 2009


Thursday, August 27, 2009
daring cooks: dobos torte
Aside from the regular banana cake or muffins that I tried to make once a while, I have never tried anything sooo pretty. I can't say that I am at my most graceful in the kitchen but boy, I am so glad I didn't burn myself while trying to do quick quick 5 mins and shuffle pans thing. Which is funny because my mom chose at this moment to want me to come see the funny movie. I am quite preoccupied this week and had no time to do pretty pictures of the cake. I will definitely bake this torte again and take more pretty pictures. Now, without further delay, please welcome my pretty torte..

The August 2009 Daring Bakers' challenge was hosted by Angela of A Spoonful
of Sugar and Lorraine of Not Quite Nigella. They chose the spectacular Dobos
Torte based on a recipe from Rick Rodgers' cookbook Kaffeehaus: Exquisite
Desserts from the Classic Caffés of Vienna, Budapest, and Prague.

Preparing parchment papers.
 Preparing sponge cake batter


 Sponge cake layer
 Chocolate Buttercream

 Assembly, I use 2 hazelnuts to prop up 1 piece of caramel topping.


The August 2009 Daring Bakers' challenge was hosted by Angela of A Spoonful
of Sugar and Lorraine of Not Quite Nigella. They chose the spectacular Dobos
Torte based on a recipe from Rick Rodgers' cookbook Kaffeehaus: Exquisite
Desserts from the Classic Caffés of Vienna, Budapest, and Prague.

Preparing parchment papers.
 Preparing sponge cake batter


 Sponge cake layer
 Chocolate Buttercream
 Assembly, I use 2 hazelnuts to prop up 1 piece of caramel topping.
Sponge cake layers
- 6 large eggs, separated, at room temperature
- 1 1/3 cups (162g) confectioner's (icing) sugar, divided
- 1 teaspoon (5ml) vanilla extract
- 1 cup plus 2 tablespoons (112g) sifted cake flour (SUBSTITUTE 95g plain flour + 17g cornflour (cornstarch) sifted together)
- pinch of salt
Chocolate Buttercream
- 4 large eggs, at room temperature
- 1 cup (200g) caster (ultrafine or superfine white) sugar
- 4oz (110g) bakers chocolate or your favourite dark chocolate, finely chopped
- 2 sticks plus 2 tablespoons (250g) unsalted butter, at room temperature.
Caramel topping
- 1 cup (200g) caster (superfine or ultrafine white) sugar
- 12 tablespoons (180 ml) water
- 8 teaspoons (40 ml) lemon juice
- 1 tablespoon neutral oil (e.g. grapeseed, rice bran, sunflower)
Finishing touches
- a 7” cardboard round
- 12 whole hazelnuts, peeled and toasted
- ½ cup (50g) peeled and finely chopped hazelnuts
Directions for the sponge layers:
NB. The sponge layers can be prepared in advance and stored interleaved with parchment and well-wrapped in the fridge overnight.
1.Position the racks in the top and centre thirds of the oven and heat to 400F (200C).
2.Cut six pieces of parchment paper to fit the baking sheets. Using the bottom of a 9" (23cm) springform tin as a template and a dark pencil or a pen, trace a circle on each of the papers, and turn them over (the circle should be visible from the other side, so that the graphite or ink doesn't touch the cake batter.)
3.Beat the egg yolks, 2/3 cup (81g) of the confectioner's (icing) sugar, and the vanilla in a medium bowl with a mixer on high speed until the mixture is thick, pale yellow and forms a thick ribbon when the beaters are lifted a few inches above the batter, about 3 minutes. (You can do this step with a balloon whisk if you don't have a mixer.)
4.In another bowl, using clean beaters, beat the egg whites until soft peaks form. Gradually beat in the remaining 2/3 cup (81g) of confectioner's (icing)sugar until the whites form stiff, shiny peaks. Using a large rubber spatula, stir about 1/4 of the beaten whites into the egg yolk mixture, then fold in the remainder, leaving a few wisps of white visible. Combine the flour and salt. Sift half the flour over the eggs, and fold in; repeat with the remaining flour.
5.Line one of the baking sheets with a circle-marked paper. Using a small offset spatula, spread about 3/4cup of the batter in an even layer, filling in the traced circle on one baking sheet. Bake on the top rack for 5 minutes, until the cake springs back when pressed gently in the centre and the edges are lightly browned. While this cake bakes, repeat the process on the other baking sheet, placing it on the centre rack. When the first cake is done, move the second cake to the top rack. Invert the first cake onto a flat surface and carefully peel off the paper. Slide the cake layer back onto the paper and let stand until cool. Rinse the baking sheet under cold running water to cool, and dry it before lining with another parchment. Continue with the remaining papers and batter to make a total of six layers. Completely cool the layers. Using an 8" springform pan bottom or plate as a template, trim each cake layer into a neat round. (A small serrated knife is best for this task.)
Directions for the chocolate buttercream:
NB. This can be prepared in advance and kept chilled until required.
1.Prepare a double-boiler: quarter-fill a large saucepan with water and bring it to a boil.
2.Meanwhile, whisk the eggs with the sugar until pale and thickened, about five minutes. You can use a balloon whisk or electric hand mixer for this.
3.Fit bowl over the boiling water in the saucepan (water should not touch bowl) and lower the heat to a brisk simmer. Cook the egg mixture, whisking constantly, for 2-3 minutes until you see it starting to thicken a bit. Whisk in the finely chopped chocolate and cook, stirring, for a further 2-3 minutes.
4.Scrape the chocolate mixture into a medium bowl and leave to cool to room temperature. It should be quite thick and sticky in consistency.
5.When cool, beat in the soft butter, a small piece (about 2 tablespoons/30g) at a time. An electric hand mixer is great here, but it is possible to beat the butter in with a spatula if it is soft enough. You should end up with a thick, velvety chocolate buttercream. Chill while you make the caramel topping.
Directions for the caramel topping:
1.Choose the best-looking cake layer for the caramel top. To make the caramel topping: Line a jellyroll pan with parchment paper and butter the paper. Place the reserved cake layer on the paper. Score the cake into 12 equal wedges. Lightly oil a thin, sharp knife and an offset metal spatula.
2.Stir the sugar, water and lemon juice in a small saucepan. Bring to a boil over a medium heat, stirring often to dissolve the sugar. Once dissolved into a smooth syrup, turn the heat up to high and boil without stirring, swirling the pan by the handle occasionally and washing down any sugar crystals on the sides of the pan with a wet brush until the syrup has turned into an amber-coloured caramel.
3.The top layer is perhaps the hardest part of the whole cake so make sure you have a oiled, hot offset spatula ready. I also find it helps if the cake layer hasn't just been taken out of the refrigerator. I made mine ahead of time and the cake layer was cold and the toffee set very, very quickly—too quickly for me to spread it. Immediately pour all of the hot caramel over the cake layer. You will have some leftover most probably but more is better than less and you can always make nice toffee pattern using the extra to decorate. Using the offset spatula, quickly spread the caramel evenly to the edge of the cake layer. Let cool until beginning to set, about 30 seconds. Using the tip of the hot oiled knife (keep re-oiling this with a pastry brush between cutting), cut through the scored marks to divide the caramel layer into 12 equal wedges. Cool another minute or so, then use the edge of the knife to completely cut and separate the wedges using one firm slice movement (rather than rocking back and forth which may produce toffee strands). Cool completely.
Note to self: Separate all pieces of caramel covered pieces before caramel cool.
Assembling the Dobos
1.Divide the buttercream into six equal parts.
2.Place a dab of chocolate buttercream on the middle of a 7 1/2” cardboard round and top with one cake layer. Spread the layer with one part of the chocolate icing. Repeat with 4 more cake layers. Spread the remaining icing on the sides of the cake.
3.Optional: press the finely chopped hazelnuts onto the sides of the cake.
4.Propping a hazelnut under each wedge so that it sits at an angle, arrange the wedges on top of the cake in a spoke pattern. If you have any leftover buttercream, you can pipe rosettes under each hazelnut or a large rosette in the centre of the cake. Refrigerate the cake under a cake dome until the icing is set, about 2 hours. Let slices come to room temperature for the best possible flavour.
Subscribe to:
Comments (Atom)